List of all clipping form
In all the following example, "a" and "b" are arbitrary integer.
The first integer "a" always affect the most general setting of the form, while the seconde integer "b" (if any) affect an alternate setting of the form. If the form has x, y and z variations, the second integer "b" (if any) is always a distance along this axis. For example, "box_y 128 256" means 128 along x-axis and z-axis, and 256 along y-axis.
Forms that have X, Y and Z axis variations are only explained for the Z-axis one, but it is easy to figure out how does it work for X-axis and Y-axis variation ;)
The left part of each image is for the side view, the right part is for the top view.
sphere
cube
ellipse_x, ellipse_y, ellipse_z
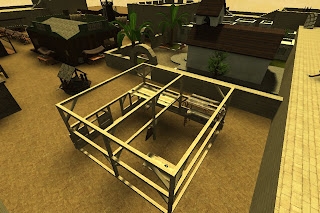
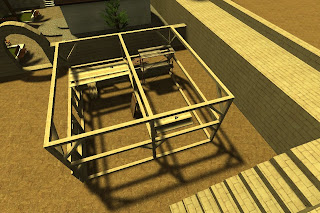
box_x, box_y, box_z
cylinder_x, cylinder_y, cylinder_z
cone_x, cone_y, cone_z
pyramid_x, pyramid_y, pyramid_z
circle_infinite_x, circle_infinite_y, circle_infinite_z
square_infinite_x, square_infinite_y, square_infinite_z
Friday, January 23, 2009
Wednesday, January 21, 2009
Using far-clipping part 2: with grass
What is wrong with the sphere clipping form
Let's say you have made a whole terrain with a lot of func_static, each func_static consists in few grass brushes. You have used "sphere 512" for each farclip key. In this example, we only display 3 grass func_static:
For each point of view:
So what we need is something that clip close if we stand on the ground, but something that clip farther if we jump, or climb some crate, or join spec...
Good news: the "cone_z" clipping form is just designed for that!
It looks like that:
Now if we apply this to the previous example, we get this:
For each point of view:
More about the cone_* clipping form
Using cone_z, the cone will have Z as its axis. You can use cone_x or cone_y if you want your cone along X or Y axis.
While using cone_z, the first number is the clipping distance that occurs if your point of view has the same z-coordinate than the origin of your func_static.
The second number describe how fast the radius of the clipping distance grow up.
If you specify "cone_z x-value y-value", you get this (here x-value = y-value):
For each game-unit you move up, the clipping radius grow by one game-unit.
Setting y-value to twice the x-value, you get something like that:
This time, for each game-unit you move up, the clipping radius grow by two game-units.
Few advices
So if your grass are small and use the same color than your ground texture, I suggest using a narrow cone. If your grass is really small a simple sphere-clipping will do it better.
If your grass are rather big, using a cone_z with the first argument equal to the second is good.
If your grass is as big as human, I suggest using a wide cone. I have made some test with this setting "cone_z 512 2048", that was looking good. However, I strongly suggest you to leave some grass brushes here and there into the worldspawn (meaning not far-clipped): this will not really cost framerate drop, but this will looks definitively better.
Oh, and have you noticed that I have used numbers like 512 or 2048? This is because all value are rounded to the closest multiplier of 64 (for data compression).
Let's say you have made a whole terrain with a lot of func_static, each func_static consists in few grass brushes. You have used "sphere 512" for each farclip key. In this example, we only display 3 grass func_static:
For each point of view:
- A. can see grass 1 and 2, that's good because 3 is too far, and behind 1, 2, and all grass brushes between 1 and 2: it is probably impossible to see it.
- B. can only see 1... just elevating the point of view make 2 too far away... this is not really fine...
- C. is so high that all 3 grass brushes are too far and aren't displayed... that's not fine.
So what we need is something that clip close if we stand on the ground, but something that clip farther if we jump, or climb some crate, or join spec...
Good news: the "cone_z" clipping form is just designed for that!
It looks like that:
Now if we apply this to the previous example, we get this:
For each point of view:
- A. can see grass 1 and 2, that's good because 3 is too far, and behind 1, 2, and all grass brushes between 1 and 2: it is probably impossible to see it.
- B. and C. can see 1, 2 and 3, and that's good because 3 is no longer hidden behind 1 and 2.
More about the cone_* clipping form
Using cone_z, the cone will have Z as its axis. You can use cone_x or cone_y if you want your cone along X or Y axis.
While using cone_z, the first number is the clipping distance that occurs if your point of view has the same z-coordinate than the origin of your func_static.
The second number describe how fast the radius of the clipping distance grow up.
If you specify "cone_z x-value y-value", you get this (here x-value = y-value):
For each game-unit you move up, the clipping radius grow by one game-unit.
Setting y-value to twice the x-value, you get something like that:
This time, for each game-unit you move up, the clipping radius grow by two game-units.
Few advices
So if your grass are small and use the same color than your ground texture, I suggest using a narrow cone. If your grass is really small a simple sphere-clipping will do it better.
If your grass are rather big, using a cone_z with the first argument equal to the second is good.
If your grass is as big as human, I suggest using a wide cone. I have made some test with this setting "cone_z 512 2048", that was looking good. However, I strongly suggest you to leave some grass brushes here and there into the worldspawn (meaning not far-clipped): this will not really cost framerate drop, but this will looks definitively better.
Oh, and have you noticed that I have used numbers like 512 or 2048? This is because all value are rounded to the closest multiplier of 64 (for data compression).
Libellés :
mapping
Tuesday, January 20, 2009
Using far-clipping, part 1
Why using far-clipping
Far-clipping is commonly used in every game that take place outdoor. Most of time, grass geometry are clipped (meaning not rendered) every time it is too far away from the camera's point of view.
This is used for performance issue, cause your CPU doesn't have to send this geometry to your video card, and your video card don't have to render them.
Far-clipping can be used in place where fails the famous Q3's Potential Visibility Set (known as PVS, computed by q3map2 at VIS stage). The PVS is very efficient indoor, for game just like Q3, with map that consist of rooms and corridors. Far-clipping is efficient outdoor, for big landscape, allowing nice details close to the camera, while skipping those that are too far away. It can be used too if you have some detailed objects inside a house that can't be skipped using the VIS-stage because your house has too many windows, or this object stand in front of one of them... so specifying a clipping distance allow you to remove it from the render scene, if farther than the clipping distance, only few pixels of this object remain visible.
Well, I'm sure most of you are thinking "wait a minute, I have never seen far-clipping in Q3 engine", and you are right... But I have just coded this for Smokin' Guns. And that will be available with the next release! (if you can't wait, just compile your own qvm from smokinguns.sourceforge.net)
Basic tutorial of far-clipping
Open your favorite testbox map with Radiant.
Create some brushes, add some textures to them.
Create an origin brush (a brush with the texture: common/origin). This origin brush is _very_ important, cause this will be the reference for computing distance to the camera.
Select all your newly created brushes and the origin brush, and turn them into a func_static (right-click, choose func->func_static in the menu entry).
Now open the entity window (hit the 'n' key). Add a new key for this entity: "farclip". Enter a value for this key: "sphere 800" (and hit 'return'). You should have something that looks like that:
Compile your map as you usually do, launch the game, and look at your func_static entity: every time you get close to it, it appears, every time you move far away from it, it disappears...
Setting farclip to "sphere 800" means that your func_static is magically clipped every time you are farther than 800 game units (same unit used by Radiant) from it.
Here what you get in-game:
You may want your func_static to cast shadows (unlike those screenshots), just open the entity window, and add the key "_cs" (or "_castshadows", it is the same) with a value of 1.
If you want a cubic clipping, change the value of the farclip key to "cube 800".
Here is the clipping frontier you get:
How to use far-clipping with a model
For instance only func_static support far-clipping. If you want to attach a model as func_static, you have 2 ways of doing it. First you specify this model in a "model2" key you add to a func_static entity, but this is weird cause you can't adjust anything with that.
The second way I discovered recently just consists to target your func_static. It is easy, just deselect all, select your model, select a brush which is part of the func_static, and hit Ctrl-K: an arrow will be displayed from your model to the func_static entity. If you open the entity window, you will see that your func_static has now a key named "targetname" with the same value that you will found in your model's entity window under the "target" key. Repeat this for all models you want to be part of the func_static entity (don't forget to deselect all by pressing the escape key before starting to include the next model).
Note that including one or more models to an entity works for most of entity type (including for example SG's specific entity like func_door_rotating).
Now if you want that your models cast shadows, don't forget to add "_cs" key with a value of 1 to your func_static entity!!! If you don't do that, even if you specify _cs=1 in your model pseudo-entity window, it will not work.
Here screenshots of the entity window for the func_static (left) and for the model window (right):
Here what you get in-game:
Of course, those example look stupid, but here an example where far-clipping is usefull, in the big house of Alamo, there is a lot of object that have many polys:
From these point of view they are really small, but still have the same amount of tris:
And this can't be helped by hintbrushing... because there are too many windows, not enough VIS-blocker wall...
So in the next release of Alamo, all this stuff will be clipped if you are too far away.
Important note about the origin brush!
Q3 engine assume for all entities that their bounding box are symetric along all axis!
So when you are about positionning the origin brush, move it exactly at the center of your entity, in the middle of both brushes and models that target your func_static.
If you don't do that, your entity's bounding box will be extended to get this axial symetry.
During the VIS-processing, if any part of the bounding box is visible from a cluster, all your entity will be visible too from this cluster even if there is no part of the geometry that is actually visible, but just the bounding box.
About Cvar that controle far-clipping
You can controle far-clipping in-game with three Cvar:
That's all for today, see you soon for the advanced far-clipping tutorial!
Far-clipping is commonly used in every game that take place outdoor. Most of time, grass geometry are clipped (meaning not rendered) every time it is too far away from the camera's point of view.
This is used for performance issue, cause your CPU doesn't have to send this geometry to your video card, and your video card don't have to render them.
Far-clipping can be used in place where fails the famous Q3's Potential Visibility Set (known as PVS, computed by q3map2 at VIS stage). The PVS is very efficient indoor, for game just like Q3, with map that consist of rooms and corridors. Far-clipping is efficient outdoor, for big landscape, allowing nice details close to the camera, while skipping those that are too far away. It can be used too if you have some detailed objects inside a house that can't be skipped using the VIS-stage because your house has too many windows, or this object stand in front of one of them... so specifying a clipping distance allow you to remove it from the render scene, if farther than the clipping distance, only few pixels of this object remain visible.
Well, I'm sure most of you are thinking "wait a minute, I have never seen far-clipping in Q3 engine", and you are right... But I have just coded this for Smokin' Guns. And that will be available with the next release! (if you can't wait, just compile your own qvm from smokinguns.sourceforge.net)
Basic tutorial of far-clipping
Open your favorite testbox map with Radiant.
Create some brushes, add some textures to them.
Create an origin brush (a brush with the texture: common/origin). This origin brush is _very_ important, cause this will be the reference for computing distance to the camera.
Select all your newly created brushes and the origin brush, and turn them into a func_static (right-click, choose func->func_static in the menu entry).
Now open the entity window (hit the 'n' key). Add a new key for this entity: "farclip". Enter a value for this key: "sphere 800" (and hit 'return'). You should have something that looks like that:
Compile your map as you usually do, launch the game, and look at your func_static entity: every time you get close to it, it appears, every time you move far away from it, it disappears...
Setting farclip to "sphere 800" means that your func_static is magically clipped every time you are farther than 800 game units (same unit used by Radiant) from it.
Here what you get in-game:
You may want your func_static to cast shadows (unlike those screenshots), just open the entity window, and add the key "_cs" (or "_castshadows", it is the same) with a value of 1.
If you want a cubic clipping, change the value of the farclip key to "cube 800".
Here is the clipping frontier you get:
How to use far-clipping with a model
For instance only func_static support far-clipping. If you want to attach a model as func_static, you have 2 ways of doing it. First you specify this model in a "model2" key you add to a func_static entity, but this is weird cause you can't adjust anything with that.
The second way I discovered recently just consists to target your func_static. It is easy, just deselect all, select your model, select a brush which is part of the func_static, and hit Ctrl-K: an arrow will be displayed from your model to the func_static entity. If you open the entity window, you will see that your func_static has now a key named "targetname" with the same value that you will found in your model's entity window under the "target" key. Repeat this for all models you want to be part of the func_static entity (don't forget to deselect all by pressing the escape key before starting to include the next model).
Note that including one or more models to an entity works for most of entity type (including for example SG's specific entity like func_door_rotating).
Now if you want that your models cast shadows, don't forget to add "_cs" key with a value of 1 to your func_static entity!!! If you don't do that, even if you specify _cs=1 in your model pseudo-entity window, it will not work.
Here screenshots of the entity window for the func_static (left) and for the model window (right):
Here what you get in-game:
Of course, those example look stupid, but here an example where far-clipping is usefull, in the big house of Alamo, there is a lot of object that have many polys:
From these point of view they are really small, but still have the same amount of tris:
And this can't be helped by hintbrushing... because there are too many windows, not enough VIS-blocker wall...
So in the next release of Alamo, all this stuff will be clipped if you are too far away.
Important note about the origin brush!
Q3 engine assume for all entities that their bounding box are symetric along all axis!
So when you are about positionning the origin brush, move it exactly at the center of your entity, in the middle of both brushes and models that target your func_static.
If you don't do that, your entity's bounding box will be extended to get this axial symetry.
During the VIS-processing, if any part of the bounding box is visible from a cluster, all your entity will be visible too from this cluster even if there is no part of the geometry that is actually visible, but just the bounding box.
About Cvar that controle far-clipping
You can controle far-clipping in-game with three Cvar:
- cg_farclip to enable/disable far-clipping (default value is 1, enable), useful if you don't mind far-clipping because you have a powerful computer, or for various reason (if you want to compare what you gain with far-clipping, if you want to record a nice video, etc).
- cg_farclipValue will multiply all distances by this value (default is 1, can't be lesser than 1), if you want that clipping occurs twice farther, set it to 2.
- cg_farclipZoomValue: the same for the sharp rifle zoom mode (default is 3, can't be lesser than 1), it is usefull to have a different value, otherwise you will be able to notice those missing brushes while zooming.
That's all for today, see you soon for the advanced far-clipping tutorial!
Libellés :
mapping
Tuesday, January 6, 2009
Using hi-resolution external lightmap
Q3 engine and the 128x128 lightmap size limitation
That's something that have bored me since I started to map... How can I override this stupid limit of lightmap size.
When you are still new to mapping, you just don't understand why adding a key _lightmapscale with the value of 0.25 or 0.125 to the worldspawn give pretty good result on some part of the map, while being extremely ugly and blurry on some other. Because we all are very naive, we just think "let's reduce this damn value until it looks good", but it looks never good.
Why?
It is a little technical...
Q3 engine only handle 128x128 lightmap. So even if you specify a smaller value for lightmapscale or samplesize, or whatever, all your mergeable surface will be put by q3map2 in a 128x128 lightmap. This is why tiny brush have a good lightmap precision while large flat terrain have bad. Each tris can't have more than one lightmap, so larger tris can't have too much precision. And that's not all: if you have a flat surface made of multiple tris, all those tris share a single 128x128 lightmap. They are merged. Why? Because if they were not merged, you would not get a seamless lightmapping on this surface, because each tris would have a different lightmap precision, so shadows would be very sharp on small tris, and very blurry on some other, and that's a major problem especially if this is the same shadow that lie on multiple tris.
If you doubt about it, you can test it, for example by turning each ground brush you have into its own separated func_group. Face in a func_group will never be merged with face that are not in the same func_group (using this property is a common way to fix light leak). That was my first attempt to get more precision... That was awfull...
How to override the 128x128 engine limitation
I have searched the web forever... I have never seen someone getting it. I have found many forum thread talking about that, some people's answer was: "use the -lightmapsize switch of q3map2", but they have probably never tested it, cause this switch is for Wolfenstein/ET, if you use it for Q3, you get a full illuminated map, cause the engine just don't load those lightmap.
There is only one solution, I found it yesterday, you should use shaders. You should use an external lightmap. Ydnar (the author of q3map2) does that for this purpose! Too bad this feature is just badly documented (as many q3map2's feature). For each surface you want to have a greater lightmap, you have to write this shader:
"q3map_lightmapSize 1024 1024" instruct the compiler to put the result of the lightmap for all face using this shaders into one or more external TGA image file (standard lightmap are directly stored into the BSP) with a 1024x1024 size, that will be written in your /map/name_of_your_map directory, with a name like lm_0000.tga, lm_0001.tga, and so on. Note that you can eventually modify them with your favorite image editor if something look bad.
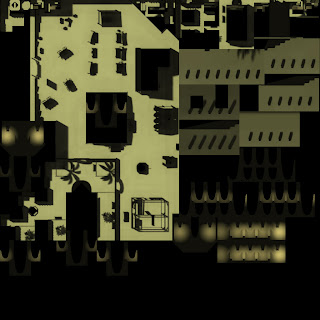
Alamo's external hi-res 1024x1024 lightmap:
Then q3map2 auto-generate a shader file in the /script directory named q3map2_name_of_your_map_lightmap.shader. Here is what you found in this file:
That's the trick! Your external lightmap is just meant as a standard texture! Be carefull, cause q3map2 is forced to create one shader for every lightmap/texture combination. That's why it is best to use a huge lightmapsize, you have good chance that one texture will be combined with only one lightmap.
q3map_lightmapBrightness 2.0 instruct the compiler to render the surface twice as bright. You should have this to work cause standard lightmap use overbright bits, without this line, your surfaces will look darker than usual. With a value of 2.0, they will look exactly as bright as it used to be.
In the stage part of the shader (remember that stage are for the renderer, while q3map_* are directive for the compiler), there is an important line: tcgen lightmap. That's the trick I missed for days... In all usual shader (using true built-in lightmap), this line is implicit. But here we use a conventionnal texture that play the role of a lightmap, so the renderer should be aware that we want to use the lightmap coordinate calculated by q3map2 for this surface.
The end of those two shaders have nothing particular.
Note that if you want to use this trick for your terrain (modeled or indexed), you should add the directive q3map_lightmapMergable, because you want to merge all tris of your terrain into one continuous and seamless lightmap. I think you need (not tested) q3map_nonplanar and q3map_shadeangle N, and I suggest to tune the value of a q3map_lightmapSampleOffset N.
The result
I have just finished to patch Alamo, all the ground is merged into an external 1024x1024 lightmap. Look at those before/after screenshots!
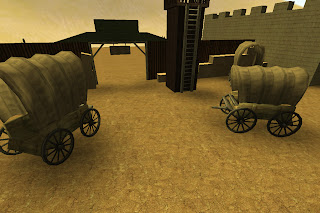
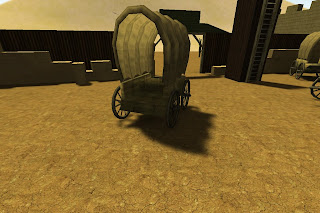
Before, those wagon have no shadow and look just like if they were floating over the ground, after, they cast a nice shadow (even the thin wheels cast shadow).
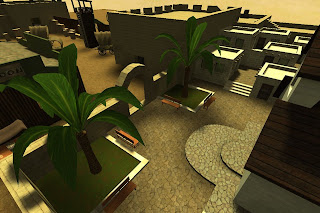
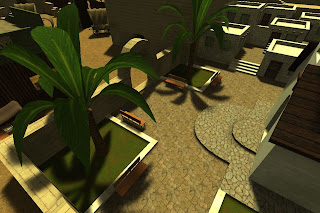
Before, those palm tree were able to cast shadow over the wall, but not on the ground. After, they have pretty detailed shadow everywhere.
Before, like the wagon, all the scene looks like it floats over the ground, under an omni-directional light... After, it's just more realistic. Note that the arch cast shadow in the second screenshot.
External lightmap are good! Use them!
That's something that have bored me since I started to map... How can I override this stupid limit of lightmap size.
When you are still new to mapping, you just don't understand why adding a key _lightmapscale with the value of 0.25 or 0.125 to the worldspawn give pretty good result on some part of the map, while being extremely ugly and blurry on some other. Because we all are very naive, we just think "let's reduce this damn value until it looks good", but it looks never good.
Why?
It is a little technical...
Q3 engine only handle 128x128 lightmap. So even if you specify a smaller value for lightmapscale or samplesize, or whatever, all your mergeable surface will be put by q3map2 in a 128x128 lightmap. This is why tiny brush have a good lightmap precision while large flat terrain have bad. Each tris can't have more than one lightmap, so larger tris can't have too much precision. And that's not all: if you have a flat surface made of multiple tris, all those tris share a single 128x128 lightmap. They are merged. Why? Because if they were not merged, you would not get a seamless lightmapping on this surface, because each tris would have a different lightmap precision, so shadows would be very sharp on small tris, and very blurry on some other, and that's a major problem especially if this is the same shadow that lie on multiple tris.
If you doubt about it, you can test it, for example by turning each ground brush you have into its own separated func_group. Face in a func_group will never be merged with face that are not in the same func_group (using this property is a common way to fix light leak). That was my first attempt to get more precision... That was awfull...
How to override the 128x128 engine limitation
I have searched the web forever... I have never seen someone getting it. I have found many forum thread talking about that, some people's answer was: "use the -lightmapsize switch of q3map2", but they have probably never tested it, cause this switch is for Wolfenstein/ET, if you use it for Q3, you get a full illuminated map, cause the engine just don't load those lightmap.
There is only one solution, I found it yesterday, you should use shaders. You should use an external lightmap. Ydnar (the author of q3map2) does that for this purpose! Too bad this feature is just badly documented (as many q3map2's feature). For each surface you want to have a greater lightmap, you have to write this shader:
textures/my_dir/my_texture_hi_res_lightmap
{
q3map_lightmapSize 1024 1024
q3map_lightmapBrightness 2.0
{
tcgen lightmap
map $lightmap
rgbGen identity
}
{
map textures/my_dir/my_texture.jpg
blendFunc filter
}
}
"q3map_lightmapSize 1024 1024" instruct the compiler to put the result of the lightmap for all face using this shaders into one or more external TGA image file (standard lightmap are directly stored into the BSP) with a 1024x1024 size, that will be written in your /map/name_of_your_map directory, with a name like lm_0000.tga, lm_0001.tga, and so on. Note that you can eventually modify them with your favorite image editor if something look bad.
Alamo's external hi-res 1024x1024 lightmap:
Then q3map2 auto-generate a shader file in the /script directory named q3map2_name_of_your_map_lightmap.shader. Here is what you found in this file:
// Custom shader file for my_map.bsp
// Generated by Q3Map2 (ydnar)
// Do not edit! This file is overwritten on recompiles.
my_map/7132892A3E304A3B1AEC29CEB002847F
{
q3map_lightmapSize 1024 1024
q3map_lightmapBrightness 2.0
{
tcgen lightmap
map maps/my_map/lm_0000.tga
rgbGen identity
}
{
map textures/my_dir/my_texture.jpg
blendFunc filter
}
}
That's the trick! Your external lightmap is just meant as a standard texture! Be carefull, cause q3map2 is forced to create one shader for every lightmap/texture combination. That's why it is best to use a huge lightmapsize, you have good chance that one texture will be combined with only one lightmap.
q3map_lightmapBrightness 2.0 instruct the compiler to render the surface twice as bright. You should have this to work cause standard lightmap use overbright bits, without this line, your surfaces will look darker than usual. With a value of 2.0, they will look exactly as bright as it used to be.
In the stage part of the shader (remember that stage are for the renderer, while q3map_* are directive for the compiler), there is an important line: tcgen lightmap. That's the trick I missed for days... In all usual shader (using true built-in lightmap), this line is implicit. But here we use a conventionnal texture that play the role of a lightmap, so the renderer should be aware that we want to use the lightmap coordinate calculated by q3map2 for this surface.
The end of those two shaders have nothing particular.
Note that if you want to use this trick for your terrain (modeled or indexed), you should add the directive q3map_lightmapMergable, because you want to merge all tris of your terrain into one continuous and seamless lightmap. I think you need (not tested) q3map_nonplanar and q3map_shadeangle N, and I suggest to tune the value of a q3map_lightmapSampleOffset N.
The result
I have just finished to patch Alamo, all the ground is merged into an external 1024x1024 lightmap. Look at those before/after screenshots!
Before, those wagon have no shadow and look just like if they were floating over the ground, after, they cast a nice shadow (even the thin wheels cast shadow).
Before, those palm tree were able to cast shadow over the wall, but not on the ground. After, they have pretty detailed shadow everywhere.
Before, like the wagon, all the scene looks like it floats over the ground, under an omni-directional light... After, it's just more realistic. Note that the arch cast shadow in the second screenshot.
External lightmap are good! Use them!
Thursday, January 1, 2009
About me, and about the game
Smokin' Guns is intended to be a semi-realistic simulation of the Old West's great atmosphere & was developed on Id Software's Quake III Arena Engine. Here is the official website of the game:
http://www.smokin-guns.org
I'm known as Joe Kari on this forum, and on game server.
I'm french, that's why I speak english so bad ;)
I contribute to the game with a map named Alamo and with various other stuff like md3 models, textures (but in fact that's my brother that made 90% of them), shaders, and some piece of game-code too.
I will try to post some tricks and explanation that cover: mapping (with GtkRadiant), texturing (with Photoshop), md3 modeling (with Misfit Model 3D, developpement version), and shaders engineering (with... er... notepad lol). Few things are really undocumented, so I propose to share with you the results of hours of headach.
Libellés :
about
Using models
An introduction to misc models
Misc models, also known as mapobject are models external to your MAP file. You can add a misc model by right-clicking on one of your 2D view in Radiant, and by choosing in the contextual menu: misc>misc_model. You can use two kind of models: ASE and MD3.
Note that misc models are compiled by q3map2 into a your BSP file. They are external only at editing stage (there are not in the MAP file), but then they are fully incorporated in the BSP file. This mean that you don't have to include your ASE models and MD3 models in your pk3 when you release your level.
Also, the first time you will use MD3 models as mapobject, you will confuse a bit, cause MD3 are ordinary used for dynamic models too. So let's clear something right now: misc models can't be animated, even if you use an MD3 that has animation frame (in this case the first frame will be used, and the others will be ignored). And if you update an MD3, you will not see any change on your level, as long as you don't recompile your MAP file (and remember that you don't need them to be present at runtime). However, while dynamic models receive light from the lightgrid, misc models use vertex-lighting (you can make lightmap'ed models too, we will see that on another blog post).
Brushwork VS misc models
Brushwork is the base of mapping. A brush is a volume, limited by clipping plane. So a brush is a convex form (i.e. without cavity). This property ensure that for every clipping plane, the entire volume is on the same side, and that the other side is outside. So brush are very interesting for game, because of physics: you know if you are in a brush (or collide with it) if you are inside for all the clipping plane of the brush. Faceq of a brush are just the result of intersecting plane, leaving out parts of the plane that are outside. So faces are not limited to 3-sided polygone (tris), but can be 4-sided (quad), or even n-sided polygone. Of course q3map2 transform them into tris, for the renderer, but keep the brush structure for the physical engine.
A model is simply a collection of 3-sided faces. Physical engine doesn't care of them, they are unexistant for it. If you want to make them solid, you have to make a brush inside of it, with the player clip texture (block players) or the weapon clip texture (block weapons and players), the renderer just ignore those textures, only the physical engine care of it. There are some others ways to clip a model without adding clipping brush, using autoclipping, we will see that on another blog post. And of course, models are not structural, and not VIS-blocker.
Brushwork is good for:
MD3 models VS ASE models
You will soon realize that I'm a big fan of MD3, and almost never use ASE models. First because ASE are made with Radiant, so you lose most of advantage using models. And to be honest, I'm not fond of Radiant, too much bug, not very user-friendly, and lot of stuff are definitively bad (like editing texture coordinate or moving vertex).
ASE models:
A little limitation with MD3: you can't make it to big. Not a big deal, you have to scale down your md3, and scale it up in Radiant (entity special key: modelscale).
Spawnflags of a model entity
In radiant, select your model and enter the entity menu ('n').
If you want your model to be lightmapped (most of time it give you a better lighting effect), create a new key named spawnflags and give it the value of 4.
If you want your model to be autoclipped (I should warn you again that this is generally a bad idea), assign the value of 2 to this key.
Because this key works as bit-flags, if you want your model to be lightmapped and autoclipped, assign to spawnflags the value of 6 (4+2).
Next time I will explain how to use an autoclip shader to fine clip a model without hurting performance.
Misc models, also known as mapobject are models external to your MAP file. You can add a misc model by right-clicking on one of your 2D view in Radiant, and by choosing in the contextual menu: misc>misc_model. You can use two kind of models: ASE and MD3.
Note that misc models are compiled by q3map2 into a your BSP file. They are external only at editing stage (there are not in the MAP file), but then they are fully incorporated in the BSP file. This mean that you don't have to include your ASE models and MD3 models in your pk3 when you release your level.
Also, the first time you will use MD3 models as mapobject, you will confuse a bit, cause MD3 are ordinary used for dynamic models too. So let's clear something right now: misc models can't be animated, even if you use an MD3 that has animation frame (in this case the first frame will be used, and the others will be ignored). And if you update an MD3, you will not see any change on your level, as long as you don't recompile your MAP file (and remember that you don't need them to be present at runtime). However, while dynamic models receive light from the lightgrid, misc models use vertex-lighting (you can make lightmap'ed models too, we will see that on another blog post).
Brushwork VS misc models
Brushwork is the base of mapping. A brush is a volume, limited by clipping plane. So a brush is a convex form (i.e. without cavity). This property ensure that for every clipping plane, the entire volume is on the same side, and that the other side is outside. So brush are very interesting for game, because of physics: you know if you are in a brush (or collide with it) if you are inside for all the clipping plane of the brush. Faceq of a brush are just the result of intersecting plane, leaving out parts of the plane that are outside. So faces are not limited to 3-sided polygone (tris), but can be 4-sided (quad), or even n-sided polygone. Of course q3map2 transform them into tris, for the renderer, but keep the brush structure for the physical engine.
A model is simply a collection of 3-sided faces. Physical engine doesn't care of them, they are unexistant for it. If you want to make them solid, you have to make a brush inside of it, with the player clip texture (block players) or the weapon clip texture (block weapons and players), the renderer just ignore those textures, only the physical engine care of it. There are some others ways to clip a model without adding clipping brush, using autoclipping, we will see that on another blog post. And of course, models are not structural, and not VIS-blocker.
Brushwork is good for:
- physical clipping
- big structural stuff, like wall, house, corridor, ground, and so on... anything big and simple is best using brushwork
- curves!!! (yes, curves are not brush, but they are directly inside the MAP format and are created with Radiant) they can sometime replace a model
- texture coordinate are just weird axial projection, and Radiant's texturing interface just suck
- arbitrary rotation just break the whole thing, if you have made something fine, you just can't re-use it at another angle except 90°, 180° and 270° degrees... (by the way q3map2 can turn your brushwork into an ASE model, if you invoke it with the right option)
- you can't rescale a brushwork
- generated tris used by the renderer are weird too, and the T-Junction fix pass of q3map2 generate even more poly, except if you have great mapping skills and a lot of patience (but most of time, optimizing for the renderer make things more difficult for the physical engine)
- sometime doing complex stuff with brushwork, like a chariot's wheel, needs too much brush, so the physical engine will have too many test to perform, and it will hit performance when people try to interact with that (jumping on, shooting at, ...)
- small objects, object that need great precision
- object with complex geometry
- advanced texturing (only if you are using MD3)
- things that are present on your level at various and non-axial angles, and at various scale
- freedom!!! you can do everything with models, whithout dealing with brush (and Radiant) limitation/annoyance (again, only if you are using MD3)
- optimizing polycount, because you have full control over it (MD3 only)
- func entities... most of func entities (like func_train, func_pendulum, ...) accept a key named model2 but doesn't give great flexibility there (for example, you can't group many models into the same entity)
- physical engine... autoclip'ed models have to create brush for the game's physics, so it creates one brush per tris!!! For example, a simple autoclip'ed cube-box model will generate 12 brush, while only one is needed if you do it by yourself. Of course this is the worst case, most of time you will get 3 or 4 times more (in some special case you can even have less brush generated, if you are not using the autoclip spawnflag but a special autoclip shader that cover roughly your geometry)... Never use the autoclip spawnflags on small or high polycount object...
- big structure... since they can't be structural nor VIS-blocker, if you want to use them for big structure you have to seal the area with caulk... you can use them anyway, for terrain for example, but do it only if you can't make it with brushwork or an indexed terrain
- light: models are basicly using vertex-lighting that isn't very good-looking (except for small and/or high polycount object)... you can turn them into lightmap'ed models, sometime it does it well, sometime not too much
MD3 models VS ASE models
You will soon realize that I'm a big fan of MD3, and almost never use ASE models. First because ASE are made with Radiant, so you lose most of advantage using models. And to be honest, I'm not fond of Radiant, too much bug, not very user-friendly, and lot of stuff are definitively bad (like editing texture coordinate or moving vertex).
ASE models:
- are made using Radiant, then compiled with q3map2 with special option (first with bsp -meta -patchmeta -subdivisions 6 then with bsp -convert [your_bsp])
- are usefull if you have done some brushwork, then realize that you need to duplicate it with a random angle and a random scale
- are made using a 3D modeling software (couldn't be done with Radiant), many software support it
- you don't have to lose your nerve because of Radiant bugs/limitations/weirdness
- can use true UV texturing instead of weird axial projection
- great control over the geometry
A little limitation with MD3: you can't make it to big. Not a big deal, you have to scale down your md3, and scale it up in Radiant (entity special key: modelscale).
Spawnflags of a model entity
In radiant, select your model and enter the entity menu ('n').
If you want your model to be lightmapped (most of time it give you a better lighting effect), create a new key named spawnflags and give it the value of 4.
If you want your model to be autoclipped (I should warn you again that this is generally a bad idea), assign the value of 2 to this key.
Because this key works as bit-flags, if you want your model to be lightmapped and autoclipped, assign to spawnflags the value of 6 (4+2).
Next time I will explain how to use an autoclip shader to fine clip a model without hurting performance.
Libellés :
md3 modeling
Subscribe to:
Posts (Atom)