- use Misfit Model 3D
- export MD3 for any Q3-based game
- make a simple tree
Please note that I'm using Misfit Model 3D 1.3.8 development version, you can found it here. This is a free open source software (GPL version 2).
First we have to make the trunk and branches of the tree.
We will use cylinder as primitive for that. Depending on the size of the trunk a cylinder with 10 or 12 sides is good. For the branches, we need 6 or 8 cylinder sides.
So let's start to create those 2 cylinders.
- Choose the cylinder primitive tool
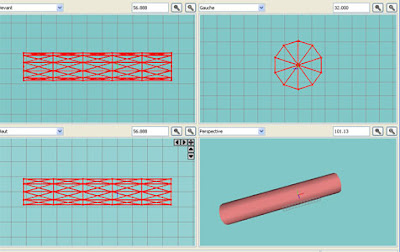
- Some option appear under the toolbar, set side to 10 and segment to 5 (it will be usefull to have many segment to "bend" branches and trunk later), keep the 2 others value to 100
- Drag your cursor in the front 2D view
- You should see that:
Some trick about how to navigate in 2D and 3D view:
- to zoom in or zoom out the view: use the mouse wheel while hovering a 2D or 2D view
- to move: middle click (the mouse button) while moving the mouse
- to turn around: in the 3D view just left click while moving, in a 2D view left click while pressing the Ctrl key and moving (you will turn this view into orthographic view, to turn it back to front/back/top/bottom/left/right view, just select the right item in the drop-down list just above the view)
- to rotate: press Ctrl key while using mouse wheel (note that in 2D view it leads to orthographic view, same notice as above)
Note that in Misfit Model 3D, the 3D view is just for visualization, you can't perform anything here.
- Now choose the rotation tool
- In the front view, rotate 90° the cylinder, you have to press Shift while doing it so that the cylinder will only move by 15° degree increment
- Choose the scale tool, set tool's option (just under the toolbar) to "keep 2D aspect" and adjust the size of your trunk in the top view
- Choose the "vertex select tool" (shortcut: V)
- In the top view, select the vertex at the center of the disc, you have probably select 2 vertex
About each 4 select tools:
- a left-click-drag select
- a Shift + left-click-drag add to current selection
- a right-click-drag remove some part of the current selection
There are 2 ways of selecting vertex:
- choose exactly the vertex you want in a 2D orthographic view (you have to move and turn around to be sure to select only vertex you want)
- my prefered way to do it (most of time it is faster) is to simply select in a standard front/back/top/bottom/left/right view, and then deselect undesired vertex in another 2D view
You should notice that at the bottom right of the window, you know everytime how many vertex and faces you have selected, and the total vertex and faces count of the whole model. For example:
V:30/62 F:40/120
... indicate your whole model have 62 vertex and 120 faces, you have currently selected 30 vertex and 40 faces.
- Deselect the higher vertex (so with a right-click-drag) in the front view
- Hit the delete key to erase this vertex (or in the menu choose Geometry->Delete): we don't need extra face at the base of the trunk since those face will never be seen in-game
- Select again the central vertex in the top view
- Choose the move tool (shortcut: M), and in the front view, move this vertex higher (you can press Shift to constrain the move along axis)
- You should get that:
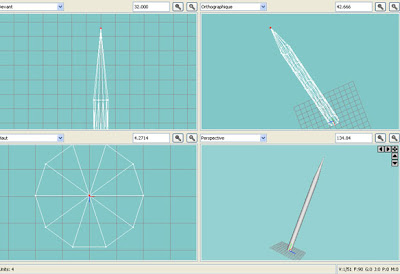
Now we have to texture it right now, because it will be a nightmare to do it later. For instance, the model is a simple cylinder with a peak at the top, so we can use a cylinder projection for texture coordinate.
Always texturize your models early if you can. Always have in mind the way you will texturize it.
Designing the whole geometry and texturize it at the end is often a disaster (with the exception of complex models like human or animal, for those models you have to use another kind of software: unwrapper).
So...
- First, it is time to save your model somewhere right now, because now, we will use texture (that are external), so if we don't want to bother later with path, save it under the directory smokinguns/models/my_models_directory (or my_q3mod/models/my_models_directory)
- Enter the menu Materials->Edit Material (shortcut Ctrl+M), it open a material panel
- Now click the button "new material" and give it a name: "wood". The name is important, cause later we will define MD3 model's meta data, so choose a short name, if this name has 2 word, use the underscore '_' to separate them
- Click the "choose texture" button and browse smokinguns textures (I choose smokinguns/textures/joekari_wood/wood_breli_bark1.jpg in this example)
- Click "ok" and leave the material panel
Now we will deal right now with the MD3 Meta data. It is one of the trikiest part of MD3 modeling, since there isn't any documentation on how to do it well... I have had hard time to figure out how to do it the way it can support multiple texture/shader that are NOT in the same path than the model. Fortunately, I will give you the result of hours of headache.
- Enter the menu "model -> edit model meta data" (here I'm guessing the menu entry name, cause I'm running a french version of Misfit Model 3D).
- Click the new button, a new line appear (name / value), double-click it, a dialog box appear
- Set the name to "MD3_PATH_wood", note that IT IS CASE SENSITIVE, the rule is "MD3_PATH_" + the name of your material that should match. We have previously named this material "wood", the meta data name should be
- "MD3_PATH_wood"
- In the value field, enter the directory path of your texture where Radiant and quake3/smokinguns.exe will found it, here it is "textures/joekari_wood/" (note that it is just the directory part, not the complete path, the filename is not required here).
- Click "ok" to close the dialog box, and then "ok" to close the meta data panel
Now we are going to apply texture on our model.
- Choose the "connected mesh tool" (shortcut C) and click somewhere inside your model in a 2D view. The connected mesh tool select all face that are connected together. All your model should turn red right now.
- Enter the menu "Material -> Edit group" (shortcut Ctrl+G), it open a panel to manage group
- Click the "new" button, a dialog appear, name it "wood" (note that you can name it whatever you want, it is only for your convenience, and have no effect), hit "ok" and close the dialog box
- Back in the group panel, click the "add to group" button: it will add all selected faces to the group named "wood"
- Choose in the drop-down texture list the only one material we have: wood
- Click "ok" to leave this panel
Now your 3D view show you that your model have a texture:
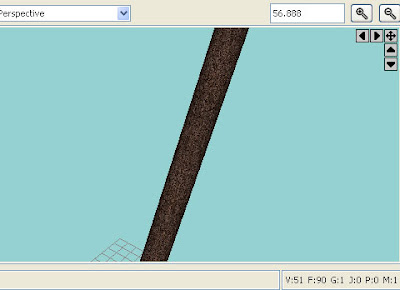
For instance, the texture coordinate are just silly, as you can see. So...
- Choose the "create projection tool", some tool's option appear under the toolbar, choose the type "cylinder"
- In the front view, drag a projection cylinder over your model (press Shift to constrain it along one axis)
- Choose the move tool (if you have deslected the projection, select it again with the "select projection tool"), and move the projection, using the top view to center it on your model
- Now, using the "select connected mesh tool" (shortcut C), click your model
- Enter the menu "Material -> Edit projection", it open a panel, click the button "add faces to projection" and close the projection panel
- Select the projection (with the select projection tool), then delete it (delete key): Misfit remember that face are linked to a projection, and when you move the projection or the model, the textures coordinate are moving, so to prevent that, we just destroy the projection
- Select your whole model (same way than before)
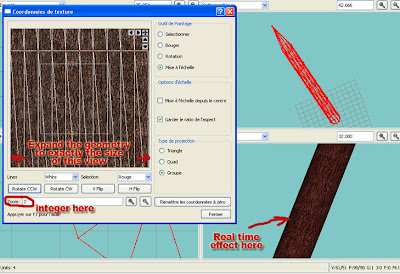
- Enter the menu "Material -> Edit texture coordinate" (shortcut Ctrl+E), it open the texture coordinate panel, here you can see the way all your selected face are using your texture. If you need it, choose the "scale tool" of the texture coordinate panel, uncheck "keep aspect ratio", and rescale the texture the way you want (note that the 3D view in the background window is updated in real time)
- Where rescaling horizontaly, have in mind that your texture should wrap around, or you will see a seam line somewhere on you model (you should use 1 time, 2 times or 3 times the texture width, but not one and a half for example)... how to do it ? Set the zoom value to 2 for example (or any integer value), and when you strech your vertex in the texture coordinate view, use exactly the same width:
- Then exit the texture coordiante panel
Now we will use this part of the model as the base for copy-paste geometry of the tree.
If you will, you can do another cylinder with less sides, for futures branches, just repeat the process.
So...
- Select the whole model (you know how to do it now)
- Enter the menu Geometry -> Duplicate (shortcut Ctrl+D)
- Choose the move tool, and move away the freshly duplicated mesh, as said before, it will be used for copy-paste everytime, so keep this one unchanged. Move it so it will not be in any of the front, right or top view of your main model, so it will not interfere.
Now we will work on the trunk. First we will adjust size.
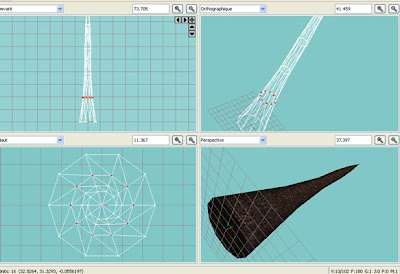
- Select a line of vertex of your trunk in the front view (I mean a circle of vertex in a 3D sens, but in the front view they are in a line... the vertex that split the cylinder into segment)
- Choose the scale tool, and rescale those vertex IN THE TOP VIEW using "keep 2D ratio" option
The base of the trunk have to be wider. After you do it several time, you get that:
Now we have to twist and bend a bit this trunk.
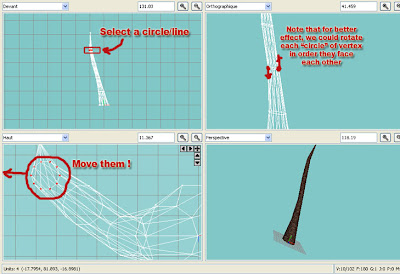
- Select a circle of vertex (front view)
- Move a bit the whole circle in the top view
- Repeat that for other circle
You should get something like that:
When it looks good, we will decide to create branches (just duplicate the mesh that you have keep for copy-paste).
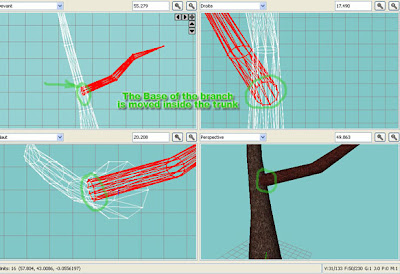
Deform it with the same technics, scale it so it will be thiner and smaller than the trunk. You can eventually remove 1 or 2 segment (select vertex of its base and remove them).
When you have done it, just select it, rotate it and move it so its base will be "melted" somewhere in the trunk:
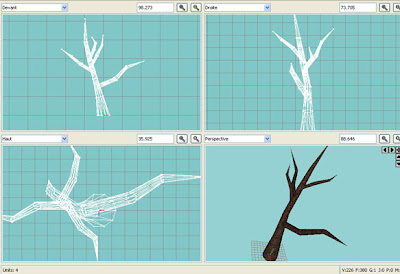
Repeat it as many time you want, but keep an eyes on the number of face your model have, most of time 3 or 4 branches looks fine.
Got something like that after few minutes:
Now the foliage. There are various way to get foliage, I will do the simpliest one cause this tutorial start to be very very long...
Open the material panel, create a new material named "foliage", browse texture (in this tutorial, I use "textures/joekari_plant/plant_pink_foliage1.tga").
Don't forget to open model's meta data and add the key/value pair: "MD3_PATH_foliage" / "textures/joekari_plant/".
This texture has an alpha channel, so we don't really have to bother with the form of the foliage.
Now...
- Choose the "create ellipsoïd tool", in the tool option, enable "sphere" and "from center", set smoothness to "1" (80 faces)
- In a 2D view drag a sphere, away form your trunk and branches
- When your sphere is still selected, enter the group manager (Ctrl+G), create a new group named "foliage", choose texture "foliage", and click "add (faces) to group", then click "ok" and exit the group manager
- Choose the "create projection tool", set the type to "sphere"
- Drag the spherical projection inside your sphere mesh, the center of the projection should match the center of your mesh
- Rotate your projection so the projection axis is vertical (you will see why few point later)
- Select your spherical mesh and go to the menu "Material -> Edit projection", inside the panel click "add faces to projection" and close that panel
- Delete the projection (same as in the begining of the tutorial)
- You can eventually enter the texture coordinate panel to adjust the texturing scale (a bit more complicated to get it work for a sphere than for a cylinder)
- You can see that some face have the texture really streched, and bad-looking, so, that why you have I advise you to rotate the axis of the projection verticaly, know you just have to select the 2 extremes vertexes and delete them.
You will get something like that:
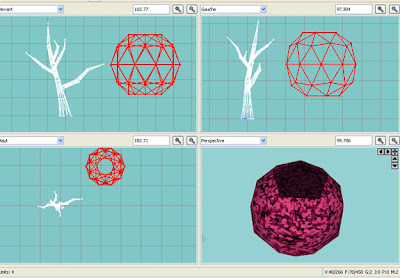
Now we are close to the end... Just copy-paste your foliage, every where you want, just change the geometric-scale to your need, rotate them, and fix them in the middle of a branches... and so on... Make larger foliage sphere that overlap and intersect smaller, deform them, do things some randomness touch...
Finally... remove useless geometry (those used for copy-paste), and move the whole model so the base of the tree match the origin, it will be easier for mapping in Radiant this way.
The result :
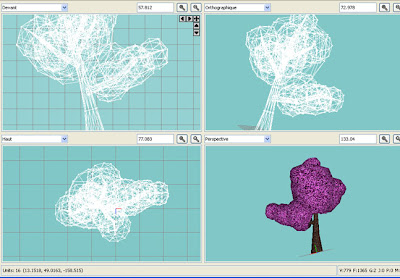
- When it is done, you just have to save your model in .md3 format
- Open Radiant, import it the way you do and compile a map
The result, in game:
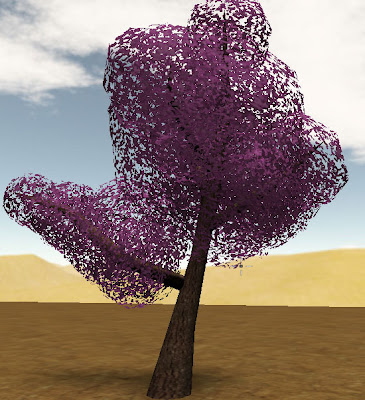
Okey, it is not perfect, but it is good enough for a first Misfit Model 3D tutorial ;)
To improve the effect, you need a better foliage texture (I simply get the first free foliage texture that I have found on google, and try to make a decent alpha channel on it).
Anyway...
All the basics tricks are here.
Very nice
ReplyDelete[url]http://www.quakeiii.nl[/url]